How to Check for Frozen Pipes and Broken Hose Bibs to Avoid Basement Flooding

Edmonton, Alberta is cold during the winter months, reaching a low of -40C at times. For people who love winter activities, it’s a perfect place to live. Unfortunately, the climate can present a host of issues for homeowners including frozen pipes and hose bibs. Damage to your home and plumbing caused by a frozen pipe that bursts and causes basement flooding can cost thousands of dollars to repair. Knowing how to identify a frozen pipe or broken hose bib can help reduce the damage done so you don’t have to break the bank to have it repaired.

Why Do Pipes Freeze in the Winter?

Frozen pipes are an unfortunately common occurrence in Edmonton because of the extremely low temperatures in the winter. You may not realize this but, plumbing pipes can begin to freeze at a temperature of -6C, which may seem like a non-concern in your home where the heat is on, but remember that your pipes may be exposed to much colder temperatures due to their location in or outside of your home. In fact, there are three distinct reasons you may experience frozen pipes this winter including:

  • The pipe is exposed to the elements. This happens most often in fixtures such as the hose bib, sprinkler system, or swimming pool lines.
  • Pipes are located in areas of your home like crawl spaces, kitchen cabinets, garages, basements, and attics where there is no direct heat source.
  • The pipes have little or no insulation wrapped around them to keep them from freezing. 

How Can I Tell If My Pipes Are Frozen?

If your pipes freeze in Edmonton it will be quite obvious, you want to be sure. The first sign will be that there is either a small trickle or no water at all coming out of the faucet. Some other common signs of frozen pipes include:

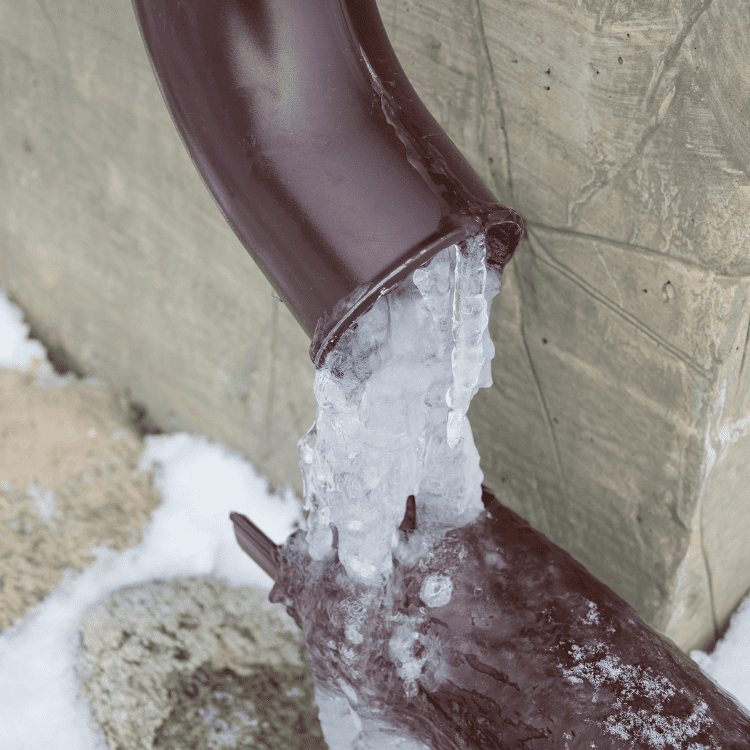
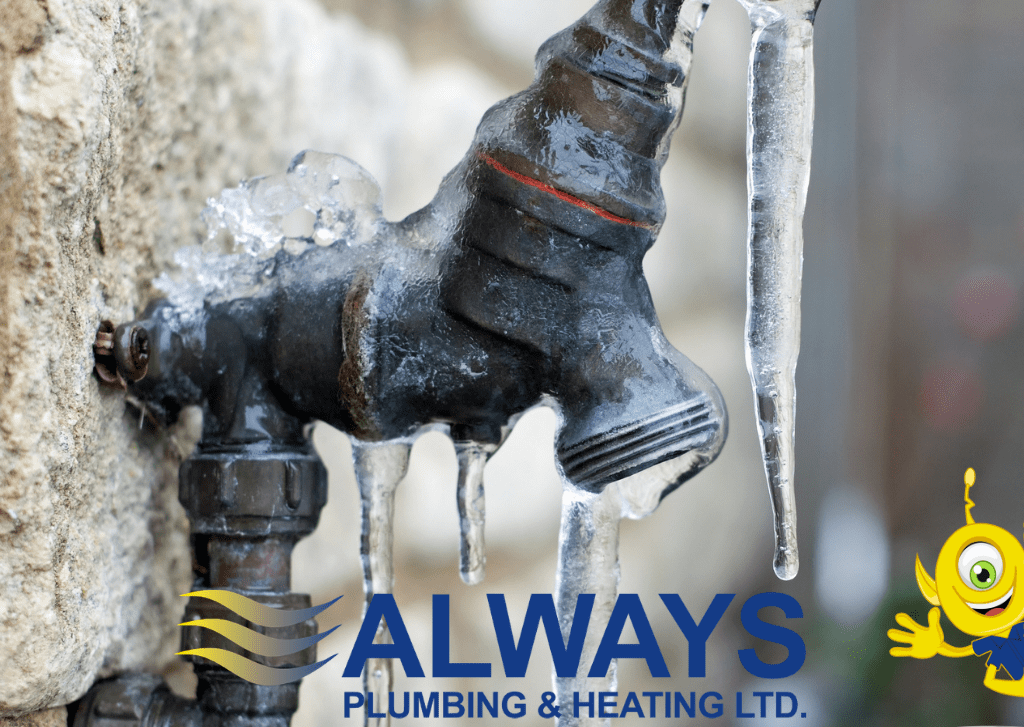
  • A layer of frost has formed on the outside of a pipe.
  • Icicles forming around pipe joints or cracks in the pipe.
  • Weird sounds coming from the pipes like banging and whistling.
  • Bubbling in the toilet when you flush.
  • Dampness and water spots on walls and ceilings.
  • Puddles of water on the floor under the pipes.
  • And, less commonly, odd odors coming from the plumbing can indicate a clogged pipe due to ice.

Do Frozen Pipes Always Burst? 

You may think that if a pipe freezes that it will automatically burst, but this isn’t necessarily the case. In fact, while the water is frozen, the pipe may not leak or burst. It typically takes a few days for pipes to freeze and burst due to the expansion of the ice inside the pipe. The resulting pressure presses on the pipes, pushing them to a breaking point. Rapid freezing and thawing, such as when the temperature drops dramatically and warms up again in the spring, is the main cause of burst pipes. Another common cause of burst pipes is when there is an attempt to thaw them using a heat gun or hair dryer to thaw the pipe too quickly. This should be done slowly and carefully. The sudden thaw can cause the pressure to build behind the freeze, causing stress on the pipes.

What Happens When Frozen Pipes Burst?

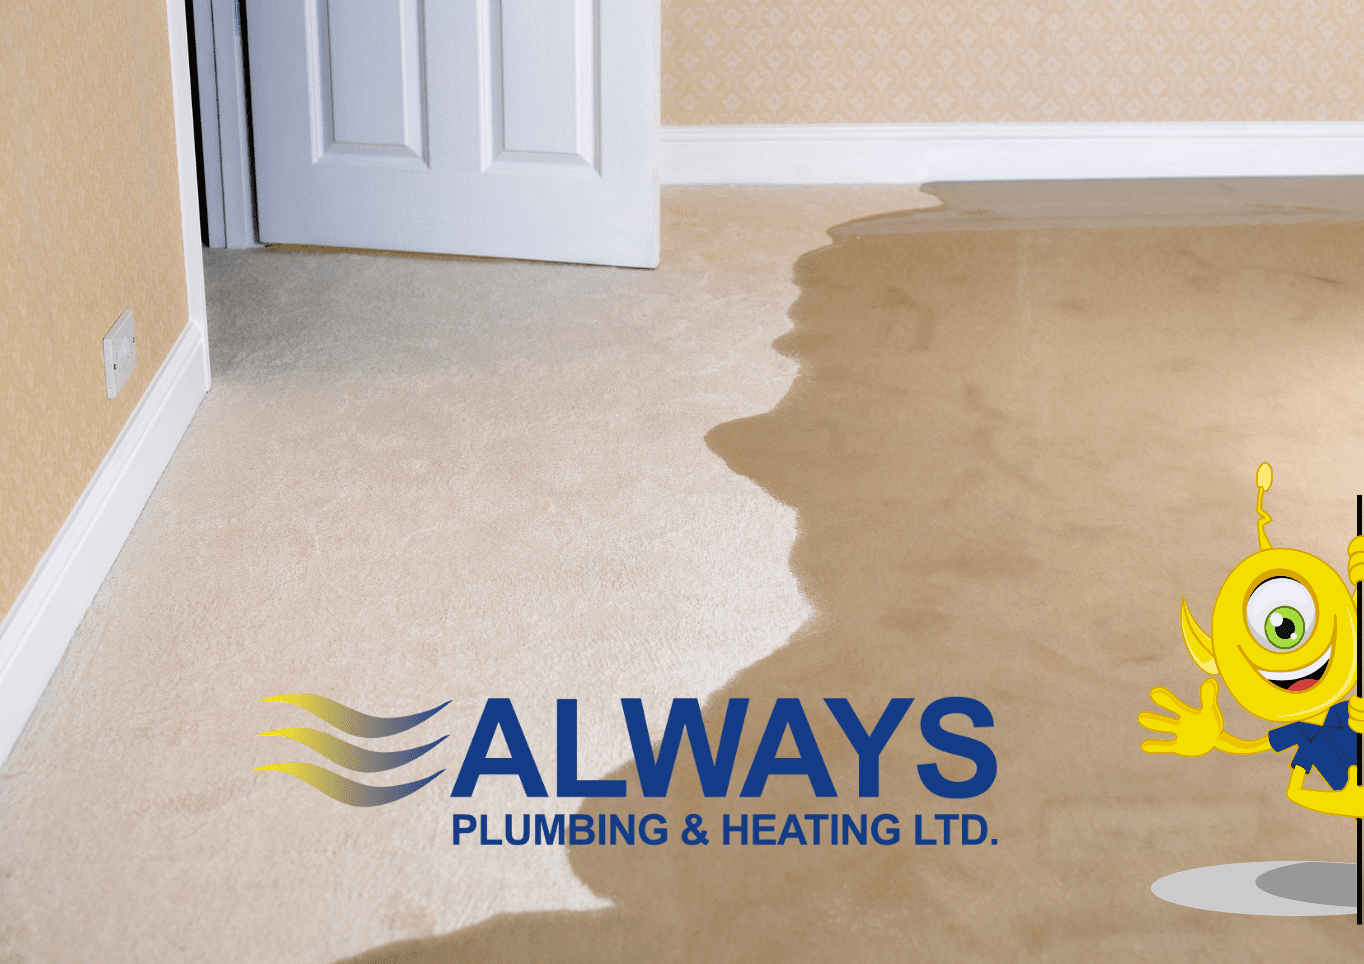
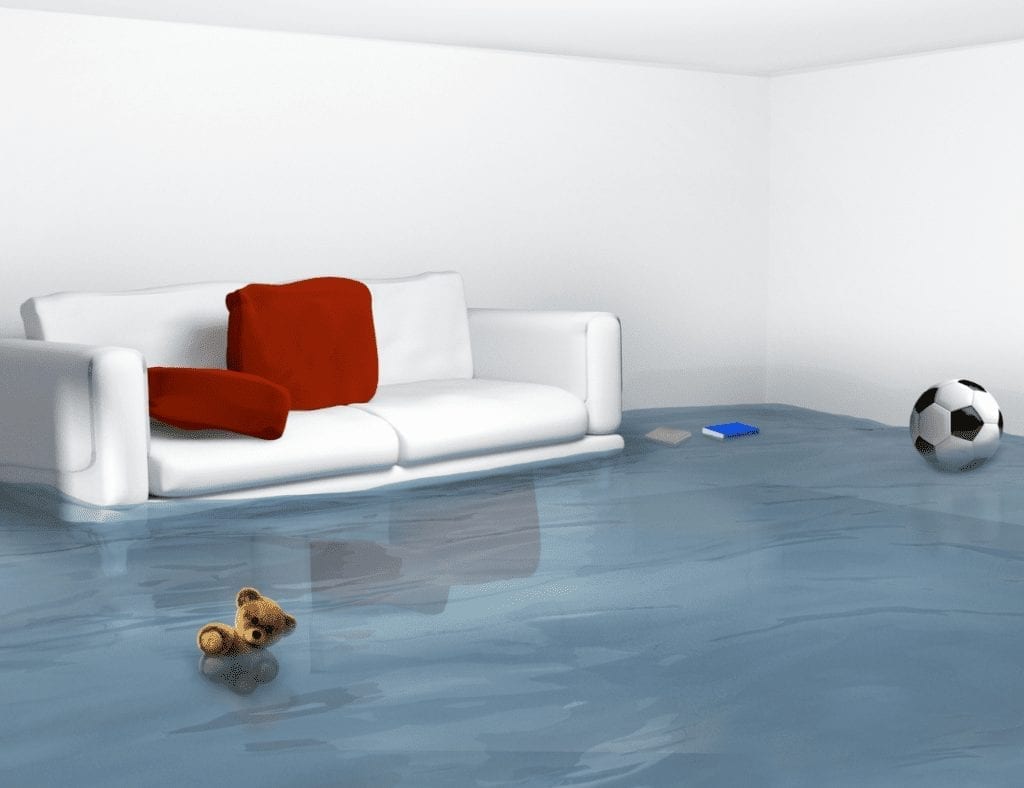
If a pipe freezes and bursts, water will flow freely from the pipe causing water to spill into your basement. The result is a wet mess that can cause serious damage to your home’s structure, HVAC system, and anything you’re storing there. The short-term water issues are just the beginning, however. If the moisture and water remain for an extended period of time, mold and mildew can develop, which can cause respiratory issues, allergies, and other health problems. Plus, a burst pipe means your home will be without water until the frozen pipes can be repaired.

Steps to Avoid A Burst Frozen Pipe and a Costly Repair

Frozen pipes are an extreme inconvenience at best and a serious issue at worst. To avoid extensive damage to your home, it’s vital to thaw your pipes relatively quickly. However, you must take care as thawing pipes can cause a host of other issues If you suspect that your pipes are frozen, it’s important to take some simple steps right away including

  1. Turn on the Faucet – Moving water will help thaw a freeze, so even a small drip coming out of the faucet can help protect your pipes from bursting if they’re frozen. This is because the pressure in the pipe is reduced due to the flow of water.
  2. Slowly Apply Heat – Time and patience are required for thawing pipes. Remember that thawing pipes too quickly can result in an immediate burst. Instead, use a space heater, or thermostatically controlled heat tape to slowly thaw the ice. If you use a hair dryer, keep it at least 15.24 cm away from the pipe and move it back and forth to avoid rapid thawing.
  3. Continue to Warm the Pipes – Whether you’re using a hair dryer, heat tape, or heater, don’t turn off the heat source until your water is fully restored and flowing. In fact, it’s a good idea to keep the area warm, even if the pipes aren’t frozen.
  4. Keep the Faucet Running – During and after your attempts at thawing the pipes, keep the faucet turned on, at least a little, to help clear the ice. If you run your water during severe cold spells, you may also avoid a freeze altogether.

Remember, slow and steady is the way to go when you are working on frozen pipes. In most cases, pipes will thaw within a half hour, or so. But, the time it will take depends on the temperature, the extent of the freeze, and where the frozen pipe is located. 

What Should I Do If I Can’t Get My Indoor Pipes Unthawed?

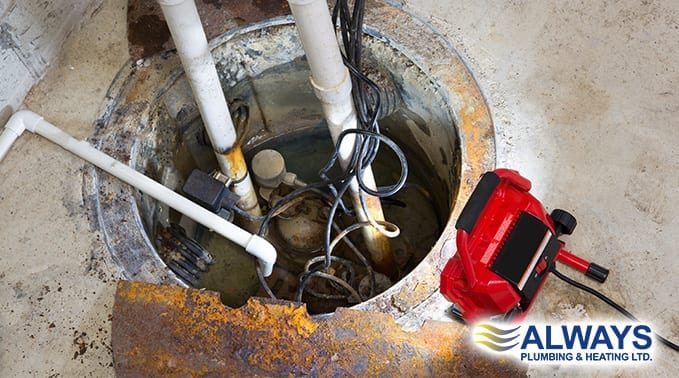
As a homeowner, you have to be able to think on your feet to handle the unexpected, such as frozen pipes. But, some jobs can be overwhelming and difficult to do on your own, especially when you have to deal with frigid temperatures and unfamiliar tools and techniques. Don’t go it alone, it could end up costing you more in the long run. To ensure your pipes are completely unthawed, it’s best to contact a plumbing professional like Always Plumbing & Heating. We have abundant experience with Edmonton’s weather and its effects on plumbing. Our certified technicians know exactly what to do to get your pipes cleared without further damage.

Why Won’t the Water Flow From My Outdoor Faucet?

Due to direct exposure to frigid temperatures, wind, ice, and snow, your outdoor faucet, also called a hose bib, is vulnerable to freezing. Oftentimes, water remains in the hose bib, and as the temperature drops, the water freezes, creating pressure within the pipe and restricting the water. This is more prevalent with older exterior faucets but can happen anytime, even if your home is well-insulated. The problem is that if the frozen pipe isn’t thawed, it can result in a burst pipe and flooding in your basement. 

Often hose bibs have frozen over winter and thawed naturally which can lead to the situation going undetected. If you are lucky, there is not any damage. Unfortunately, this can cause fractures in the hose bib and the components inside the wall. What happens frequently is when the garden hose is hooked up in the spring and turned on to water, the water may appear to have a sluggish water flow (or no flow). When this happens, potentially the water is going into the basement and it can be a huge disaster! Especially if the hose was turned on for a while and left running. This happens a lot and scarily, this can also happen even if the water pressure from the hose appears normal. 

In order to prevent this scenario at your home, it is advisable to create a habit every spring to have one person in the basement near where the hose bib is (remove ceiling panels if possible), and the other person outside. Then turn on the tap, and communicate with each other as to whether or not any leaks are noticed. 

How to Thaw a Frozen Hose Bib

Although you may not be using the water outside your home during the colder months, you shouldn’t ignore a frozen hose bib. It’s important to try to thaw the pipes so you don’t experience a burst pipe. One technique for thawing your frozen hose bib is as follows:

  • Open the hose bib spigot to allow water to begin flowing out of the faucet. Even if there is no water flow, leave the spigot open so the water can flow once you begin the thawing process.
  • Wrap towels or rags around the hose bib’s base, behind the spout. This will act as a type of scarf to warm and insulate the pipe.
  • Slowly pour boiling water over the towel until it’s saturated.
  • Continue to pour the boiling water over the cloth, until you see the water begin trickling out of the faucet. 
  • You can also use a hair dryer or heat tape, as mentioned above, to help facilitate a speedier thaw.
  • Remember to keep the hose bib faucet open until the water flows normally.

Again, if you’re unsure of what to do, or you feel the freeze is worse than you first thought, it’s best to call someone to help. A licensed plumber with experience dealing with frozen hose bibs in Edmonton is vital. You can count on the expertise of Always Plumbing & Heating to get your outdoor faucet thawed the right way. 

Are Your Interior Pipes or Outside Hose Bib Frozen?

The last thing that you want is for your home to be damaged due to a burst pipe. But, you must note that Edmonton’s climate isn’t kind to unprotected plumbing. That means that frozen and burst pipes are an all too often occurrence. We have more than two decades of experience taking care of plumbing issues throughout Edmonton. If you have frozen pipes, whether indoors or out. Whether the pipes in your basement are frozen, or your hose bib is, don’t hesitate to contact us right away. We’ll send a highly-trained technician out to evaluate the issue and thaw the pipes so you can avoid a flooded basement and damage to your home.

Thawing Wisdom- A Guide for Edmonton Homeowners With Frozen Pipes

Chill in the air, frost on the windows, and a surprise – frozen pipes! The Northern lights and winter in Edmonton may be amazing, but when your home’s plumbing starts to play its own icy symphony, it’s time to take action. Do you have a game plan? Do you know how to thaw frozen pipes? Let’s thaw out the mystery together and navigate the chilly waters of home plumbing solutions!

Common Signs of Frozen Pipes 

The first step in tackling frozen pipes is recognizing the signs. Recognizing the subtle cues that hint at plumbing troubles is crucial for timely intervention and avoiding potential damage. Here are some common signs of frozen pipes in Edmonton that homeowners should be on the lookout for:

Reduced Water Flow: One of the early signs is a noticeable decrease in water flow from faucets and showerheads. If you suddenly experience weaker water pressure, it could be an indication of frozen pipes.

Strange Noises: Gurgling or clanking sounds coming from the plumbing system can be a signal of trapped air due to frozen pipes. Pay attention to any unusual noises when using water fixtures.

Frost on Exposed Pipes: Inspect visible pipes, especially in areas like basements, crawl spaces, or garages. Frost on the exterior of pipes is a clear sign that they are exposed to freezing temperatures.

Unpleasant Odors: Frozen pipes can sometimes lead to blockages, causing water to back up. This can result in unpleasant smells emanating from drains or faucets due to trapped debris.

Difficulty in Flushing Toilets: If you notice difficulty in flushing toilets or slow drainage in sinks and tubs, it could be an indication of frozen pipes affecting the wastewater flow.

Visible Condensation: Condensation on the exterior of pipes may seem counterintuitive in freezing temperatures, but it can occur when the interior of the pipe is frozen, and the exterior is exposed to warmer air.

Water Temperature Fluctuations: Inconsistent water temperatures, particularly water coming out much colder than usual, can be a sign that pipes are frozen and restricting the flow of hot water.

Peculiar Smells from Faucets: If water from faucets has a strange or different odor, it could be a result of stagnant water due to frozen pipes impeding normal water flow.

Keeping an eye out for these signs can help homeowners identify and address frozen pipes before they lead to more significant issues. If you spot any of these indicators, taking prompt action is crucial to prevent further damage.

How to Detect and Find Frozen Pipes in Your House

Locating exposed pipes in key areas, using a pipe thermometer for temperature assessment, and checking for bulging or frost on the exterior are effective ways to detect and find frozen pipes in your house. Small sections of pipe will thaw fairly quickly, but if you have a larger area or multiple pipes, you may need to call a plumber. 

Thawing Frozen Pipes

Prompt action is crucial. Locate the main water supply and turn it off. Open faucets to relieve the pressure, and use a safe heat source for thawing. Waiting for pipes to thaw on their own may lead to further complications. Follow these easy steps to thaw frozen pipes. 

1. Identify the Frozen Section

Begin by determining which section of the pipe is frozen. This may be evident from reduced water flow, frost on the exterior, or by following the exposed pipes in colder areas of your home.

2. Turn Off the Water Supply

Locate and turn off the main water supply to prevent further water from entering the frozen pipe. This minimizes the risk of burst pipes when thawing begins.

3. Open Faucets

Open the affected faucets both hot and cold to allow water to flow through the pipes once thawing begins. This relieves pressure in the system.

4. Apply Heat Safely

Safely apply heat to the frozen section. Use a hairdryer, heat lamp, or electric heating pad. Start from the end nearest the faucet and move towards the blockage. Never use an open flame.

5. Use Warm Towels

Wrap warm towels around the frozen pipe. Soak the towels in hot water and replace them as needed. This provides consistent heat to the pipe.

6. Utilize a Space Heater

If the frozen pipe is accessible and there’s enough space, use a space heater to gently warm the area. Keep it a safe distance from flammable materials.

7. Thawing with Hot Water

Carefully pour hot water over rags wrapped around the frozen pipe. Continue until the ice inside the pipe has melted and water flows freely.

8. Check for Thawing

Periodically check the faucets for water flow as you apply heat. Once the water starts flowing steadily, the pipe is thawed. Keep the faucets open for a few minutes to ensure complete thawing.

9. Insulate Pipes

After thawing, consider insulating pipes in vulnerable areas to prevent future freezing. This is especially important for pipes in basements, crawl spaces, and exterior walls.

10. Seek Professional Help if Needed

If you’re unable to locate the frozen section or if the situation is beyond your control, it’s advisable to call a professional plumber for assistance.

Remember, safety is paramount during this process. Avoid using excessive heat, open flames, or tools that can damage the pipes. Thawing should be a gradual process to minimize the risk of pipe bursting.

FAQ

 Will Frozen Pipes Thaw on Their Own?

Understanding why waiting might not be the best option and the risks associated with allowing pipes to thaw naturally. While it’s tempting to hope that frozen pipes will thaw as temperatures rise, it’s not a guaranteed solution. The severity of the freeze, the length of exposure, and the insulation around the pipes all play crucial roles in determining whether pipes will naturally thaw.

How Long Can Pipes Be Frozen Before They Bust?

The duration that pipes can remain frozen before the risk of bursting depends on several factors. The severity of the freeze is a crucial factor. In extremely cold temperatures, pipes are more susceptible to freezing quickly. Warmer freezes may allow pipes to withstand the cold for a longer duration.

What Do Plumbers Do to Unfreeze Pipes?

Plumbers employ a range of professional techniques to efficiently and safely unfreeze pipes. We begin by assessing the extent of the frozen pipes and identifying the location of the blockage. Advanced tools, such as infrared thermometers, may be used to pinpoint the frozen pipe.

Methods used frequently include a heat gun, heated blankets, and other devices that heat metal slowly to prevent the pipe from breaking as it thaws out. 

Winter plumbing challenges are a part of life in Edmonton, but armed with the right knowledge, you can thaw out the inconvenience. Whether it’s detecting the subtle signs or understanding the do’s and don’ts of thawing, our guide has you covered. Embrace the winter wonderland without letting it freeze your pipes!

Always Plumbing and Heating is a premier plumbing and heating company serving the Edmonton area. If you need help with frozen pipes, we’re just a call away. We’ll use our knowledge and expertise to solve all of your plumbing or heating needs. 

Winter-Proofing Your House Plumbing: 10 Tips to Prevent Burst Pipes

Winter brings with it a picturesque blanket of snow, cozy nights by the fire, and the holiday spirit. However, it also comes with a potential menace – burst pipes.  Icy cold temperatures can wreak havoc on your plumbing system, causing expensive and frustrating damage. But fear not, for we’ve got you covered with 10 essential tips to winter-proof your house plumbing and ensure a stress-free season.

10 Essential Tips to Winter-Proof Your House Plumbing

1. Insulate Your Pipes

During the winter, cold temperatures can cause the water inside your pipes to freeze. When water freezes, it expands, which can put immense pressure on your plumbing system. If this pressure becomes too much, it can lead to burst pipes, flooding, and significant damage to your home. To prevent this from happening, insulating your pipes is essential. 

Wrap the insulation around the pipes, ensuring it covers the entire length. Use duct tape or special adhesive to secure it in place. Pay special attention to areas where pipes are exposed to the cold, such as those running through unheated spaces like basements, attics, and crawlspaces.

2. Seal Cracks and Leaks

Inspect your home for any gaps, cracks, or leaks that could allow cold air to penetrate. For smaller cracks, you can use caulk, while expanding foam is more suitable for larger gaps. Weatherstripping around doors and windows helps keep drafts at bay.

The integrity of your home’s building envelope plays a significant role in maintaining a warm and energy-efficient indoor environment during the winter. Any openings around your home’s structure, no matter how small, can allow cold air to infiltrate, causing drafts, making your heating system work harder, and increasing energy costs.

Why Sealing Matters:

Energy Efficiency: A well-sealed home retains heat better, reducing the workload on your heating system and helping you save on energy bills.

Comfort: By sealing cracks and gaps, you’ll eliminate drafts and cold spots in your home, making it more comfortable for you and your family.

3. Disconnect and Drain Outdoor Hoses

Before the first frost, disconnect and drain your garden hoses. Leaving them connected can lead to water backing up into the pipes inside your home. Follow these simple steps to get it done:

How to Disconnect and Drain Outdoor Hoses:

1. Shut Off the Water Supply: Begin by turning off the water supply to the outdoor faucet. This is typically done through an indoor shutoff valve. Make sure the valve is fully closed.

2. Detach the Hose: Disconnect the hose from the outdoor faucet by unscrewing it counterclockwise. Ensure the hose is fully removed.

3. Drain the Hose: To prevent water from freezing inside the hose, hold one end of the hose higher than the other, allowing gravity to assist in draining all the water out.

4. Store the Hose: Once drained, coil the hose neatly and store it in a sheltered area like a garage or shed. If you lack indoor storage space, consider covering the coiled hose with an insulating material or a hose cover to protect it from the cold.

Additional Tips:

If you have a frost-free outdoor faucet, it’s still essential to disconnect and drain hoses. These faucets can still be vulnerable to freezing if hoses are attached.

Check for any leaks or damage to the hoses before storing them. Repair or replace damaged hoses to ensure they function properly next spring.

4. Drip Your Faucets

When the temperature drops significantly, allow your faucets to drip slightly. This keeps water moving, preventing freezing. Allowing your faucets to drip, even just slightly, creates a continuous flow of water through the pipes. This flow helps release the pressure that builds up as the water freezes, lowering the risk of pipe damage.

5. Open Cabinet Doors

On exceptionally cold nights, open cabinet doors under sinks to allow warm air to circulate around pipes. By allowing warm air from your home to circulate within the cabinet, you ensure that the temperature inside the cabinet remains closer to room temperature. This prevents the pipes from being exposed to extreme cold, reducing the risk of freezing.

6. Maintain a Constant Temperature

Consistency is key. Keep your home at a steady temperature day and night. Lowering the thermostat too much at night can put your pipes at risk. Keeping a steady indoor temperature reduces the need for your heating system to work harder when trying to raise the temperature from a much lower point. This results in energy savings and lower heating bills.

7. Service Your Heating System

Ensure your heating system is in top-notch condition. Regular maintenance can prevent breakdowns during the coldest months. Over time, heating systems can accumulate dust, debris, and wear and tear, causing a decrease in their efficiency. Regular servicing ensures that the system operates at its best, which can lead to lower energy bills and reduced energy consumption.

8. Install a Smart Thermostat

A smart thermostat allows you to monitor and control your home’s temperature remotely, helping you keep an eye on your heating system. Smart thermostats provide remote control and customization through smartphone apps and smart home systems. This means you can adjust your home’s temperature from anywhere, offering a high level of convenience.

9. Insulate Your Attic

A well-insulated attic not only conserves heat but also helps prevent drafts that can freeze your pipes. During the winter, warm air rises and can easily escape through the roof. Proper attic insulation acts as a barrier, preventing this heat loss and helping to retain a comfortable indoor temperature. 

Here are some common types of insulation used in attics, choose the one that works best for you and your budget.

There are several types of attic insulation materials available, each with its own advantages and considerations. The choice of insulation material depends on factors like your climate, budget, and specific insulation needs. Here are some common types of attic insulation:

Fiberglass Insulation: This is one of the most common types of insulation. It consists of fine glass fibers and is available as batts, rolls, or loose-fill. Fiberglass insulation is known for its cost-effectiveness and resistance to moisture. It’s typically installed between the joists or rafters.

Cellulose Insulation: Cellulose insulation is made from recycled paper products and treated with fire-retardant chemicals. It can be installed as loose-fill insulation, and blown into the attic space. Cellulose is an environmentally friendly option and provides good thermal performance.

Spray Foam Insulation: Spray foam insulation is a high-performance insulation material that expands and hardens upon application. It creates an airtight seal, providing excellent thermal resistance. There are two types of spray foam insulation: open-cell and closed-cell. Open-cell foam is less dense and is often used in walls and ceilings, while closed-cell foam is denser and more suitable for attics, offering a higher R-value.

Rigid Foam Board Insulation: Rigid foam boards are made from various materials, including polystyrene, polyurethane, and polyisocyanate. These boards offer high insulation values and can be used in conjunction with other insulation types to provide additional thermal resistance. They are typically installed on the interior or exterior of the attic, depending on the specific application.

10. Prevent Drafts

Drafts allow cold air to infiltrate your home and warm air to escape. This forces your heating system to work harder to maintain a comfortable temperature, resulting in increased energy consumption and higher heating bills. Use door draft stoppers and seal gaps around windows to keep your home cozy and energy-efficient.

Winter-proofing your plumbing is a crucial task for homeowners. Taking the time to prepare your home for the colder months can save you money, stress, and the inconvenience of dealing with burst pipes. By following these 10 tips, you’ll be well on your way to enjoying a cozy, worry-free winter.

Remember, if you need assistance with any HVAC-related issues or have concerns about your plumbing, our team of experts is here to help. Don’t hesitate to reach out to Always Plumbing for all your winter home maintenance needs.

Stay warm and worry-free this winter!

Sewer Backup Valves: Why You Need One & Their Costs

Sewage needs to get out and stay out! When waste leaves your home, it should remain outside of the house in the municipal sewer system. But, not everything always goes according to plan. Sometimes, when flooding or heavy rainfall occurs, there’s a possibility sewage could flow back to your home. The best way to avoid waste flooding inside your house is with a sewer backup valve.

What Is a Sewer Backup Valve? 

A sewer backup valve is known by a few different names. You may see it referred to as a backwater valve, backflow valve, or a sewer backflow preventer. Whatever you decide to call it—these valves have a specific design, which forces the flow of sewage in one direction, away from your home and into the municipal sewer system.

Flashing flooding and heavy rainfall can overwhelm sewer lines, and then that smelly sludge wants to move back to where it flowed from. If that happens and you don’t have the right sewer backup valve in place, you could have a real mess. Sewage could come up through sink drains, toilets, bathtubs, or showers, leaving you with a stinky disaster. While the average cost of a sewer backup varies, depending on the extent of backflow, it’s definitely less expensive than installing a valve. 

How Do Sewer Backup Valves Work?

Sewer backup valves are pretty simple, but are an important step in protecting your home. These devices have a one-way flow with a flap on it. The flap opens and allows waste matter to leave your home. If that sewage ever starts to come back toward the house, the float ball inside senses the backflow, and automatically closes the flap. When the flap is closed, it blocks the pipe, so nothing will seep back in. Backflow preventer valve to the rescue! 

How Do I Know if I Have a Backflow Valve?

It’s more likely that a newer home will have a valve in place, but it’s a good idea to check regardless of the age of your home. Better safe than sorry, right? If you have a home built before 1989, you should definitely take a peek. Backwater valves weren’t required in homes built at that time. 

These valves are usually near your sump pump, and are often installed in the floor. Head to your basement (or garage, depending on how your home is built) and look around for the valve. It may have a cover on it, also known as a backwater valve access box. If it does, be sure to temporarily take it off and familiarize yourself with the apparatus.

How Do You Perform Backflow Valve Maintenance?

The biggest key here is to keep an eye on it, especially as we head into thunderstorm season. You may want to clean it every couple of months, so there’s no build-up on the backwater valve flapper. 

To do this, put on goggles, gloves, and old clothes you’re not worried about getting dirty. Remember, sewage flows through this! Take the cap off the top and check for debris. We recommend flushing clean water through the water backflow preventer, and scrubbing if needed. When you’re done, make sure you put the cap back on securely.

When performing regular maintenance, if you find the backflow valve leaking, it will likely need to be replaced.

How Much Does It Cost to Install a Backwater Valve?

If you’re looking for backwater valve installation in Edmonton, our expert technicians can take care of the job for you! And, you may be eligible for EPCOR’s Backwater Valve Subsidy Program, which could save you up to $800 on an installation.
Contact us today to talk to one of our experts and book an installation!

How to Unclog a Drain with a Snake or Drain Auger

A clogged drain? What a pain! Luckily, dislodging clogged drains is inexpensive and simple using a drain snake or auger. These plumbing devices are long, flexible (some might say snake-like) metal coils that go into the drain pipe and push or pull the obstruction out. You can use them for bathroom or kitchen sinks, showers, and tubs, and they’re a much better option than using liquid drain cleaners. It’s pretty easy to do yourself! We’ve outlined the steps here:

What You’ll Need When Cleaning a Clogged Drain 

It might be obvious, but the first tool you’ll need is a drain snake or auger. In addition to that, it’s good to have a bucket to catch any water that may spill, a rag to clean up messes, and a pipe wrench or pliers for removing the trap arm (if you’re working on a sink drain).

Remove the P-Trap

The P-trap arm is the section of pipe between the sink and the wall. Use your pipe wrench or pliers to remove this. There will likely be a bit of water in it, so have your bucket and rag nearby to minimize the mess. 

Thread the Coil into the Pipe

Once the P-trap has been removed, you’ll put the end of the snake or auger into the exposed drain pipe end. If you’re working to unclog a shower or bathtub, you’ll simply insert the cable into the drain. 

Use Gentle Pressure

Some snakes and augers have a crank on the end. If yours does, you’ll begin to crank the handle and guide the cable through the pipe. If it doesn’t have a crank, you’ll push it through with your hands. You want to be gentle! If you feel the end of the tool scratching the side of the pipe, pull it out and reposition. 

You’ll probably feel a bit of resistance whenever the pipe curves. That’s normal, just push a little harder. 

Push or Pull the Obstruction

You’ll know when you’ve hit whatever is clogging the drain pipe. Sometimes, it’s a matter of pushing it through, and sometimes, it will get stuck on the end of the cable and come back when pulling the snake out. 

If the obstruction is stuck on the cable, remove it with your fingers and toss it in the garbage. Don’t attempt to put it back down the drain!

Reassemble the Pipe and Flush It Out

If you think you’ve cleared the pipe, put the P-trap back in place and run hot water down the drain for a few minutes. This will show you whether or not you were successful. If the water is still draining slowly (or not at all), you may not have removed the entire obstruction. Remove the P-trap and try again. 

Prevention Is Key

The best way to avoid clogged drains is to be careful about what goes down them. Using a hair catcher or sink strainer can prevent unwanted materials from heading down the drain pipe. 

Call the Experts 

If using an auger or snake isn’t working, you might have a more complex clog, and it’s time to call for help. Our expert technicians will take a look at the drain and pipes, assess the problem, explain what needs to be done, and then quickly address it for you. Contact us today to book our plumbing services!

How to Prevent Basement Flooding

Coming home to find that your basement is now a swimming pool and your sofa is now a pool lounger is everyone’s worst nightmare. Worry not though, in this article we are going to cover what you need to check and what you can do to prevent that terrible situation from ever happening. 

Sump Pump Basics

So, in your basement you are likely to have a sump pump. What is a sump pump you ask? Let me explain. 

A sump pump is a pump that is used to remove any and all excess water that has built up in the sump basin. The sump basin essentially collects the runoff groundwater from around the home and holds it there in order for the sump pump to work its magic and remove it. 

Sump basins and pumps are usually installed if you live in low-lying areas or have a regular build-up of damp conditions which often lead to pooling and flooding. Most homes in Edmonton that have basements or crawl spaces are equipped with at least one sump pump. It’s important to keep on top of your sump pump and basin to maintain a water-free basement, particularly if your basement is below the water table or you are in an area that floods often with high rainfall. 

Sump Pump Issues

Sump pumps can sometimes get a little overworked or fail from a number of issues. Below I will describe some issues that may arise when your sump pump is having an off day. 

Overwhelmed Pump:

This is quite a simple issue to have but it can often lead to quite dramatic outcomes. An overwhelmed pump can be a big issue when snowmelt or heavy rainfall causes a sudden influx of water. The pump alone can’t handle the volume of water and can often fail to perform well under the strain. 

The fix for this is a simple one, make sure you sufficiently upgrade the pump you have to be able to handle increased water flow. This will allow the pump to work harder and more efficiently when you need it the most. 

The second fix is to buy a temporary backup pump. These can be battery operated, meaning that you can add them or take them away at a moment’s notice. 

It is also worth considering another pump that is fitted on the other side of your basement. This will split the workload of one pump and make it far more efficient at pumping out water, should the need arise.

Improper Fitting of the Pump:

If there is no water passing through the pump, there is a high likelihood that your sump pump isn’t working correctly. This can often come down to the fact that the pump is not fitted in the correct matter, or that it isn’t connected to the wastewater system. 

One of our specialists can take a look at your drainage system and tell you how you can properly fit the pump, fit the required drains and unclog any drains, if not fixing it themselves. 

Blockages: 

Basements are home to many kinds of dirt and debris, not to mention the debris that is brought in through the influx of water, should a storm hit. It’s important to regularly check your sump pump for blockages as these can cause the pumps to be put under extra strain, ultimately causing them to burn out and break. 

The pump has a float system that notifies the pump when to switch on and off. This system can get clogged with grime, causing the pump to either remain on all the time or never turn on at all. 

Always ensure that your pump is running clear, make sure that you clean your basement and the well in which the pump sits. This will prevent any dirt or grime from entering the pump area. You should also regularly clean your sump pump. You can learn more about that here.

How to Test Your Sump Pump

Testing your sump pump is a relatively easy task and should be undertaken on a regular basis, particularly after a heavy flood. 

Take a five-gallon bucket, fill it up with water and start pouring the water around the pump. Once the level of the water starts to rise, the pump should kick in and you will be able to hear and see it working. If it isn’t working, it’s time to consider some of the points above as to why it isn’t and get it fixed. 

Hose Bibs

Hose bibs are what you connect your hose line to. Predominately located outside, these little spigots can be bothersome if not properly cared for.

If the hose bib is frozen, as is often the case in colder climates, it can cause severe flooding issues, especially when you start using your garden hoses in the Spring. This is due to the bib rupturing due to the weakened state of the material not being able to handle the pressure of the water coming through it. 

A simple way to protect your hose bib is to wrap it in insulation and tape it tight. This can protect the bib from those cold winter frosts and snows, ensuring that the bib maintains its integrity when you come to use it. 

To properly protect the bib and keep it free-flowing, prepare it for winter by turning off the water supply to the bib, opening the external valve, and leaving the water to drain off. This way it eliminates the risk of freezing and the water pressure building up behind the bib, reducing the risk of ruptured pipes and flooding. 

To thaw out a frozen bib it’s recommended that you wrap it in old towels and keep pouring boiling water over the towels until the flow of water from the tap is free-flowing and without restraint. You can learn more about how to check your hose bibs in the spring in a safe manner by reading this article.

Summary

If you are having issues with your sump pump or hose bib then you can call us at 780-489-8118, we are here to fix up all your plumbing questions and needs. Don’t let flooding become a major issue for your home. Call the experts at Always Plumbing & Heating today. We will send a professionally trained plumber to your home to evaluate the situation to set you up for optimal flood protection. Keep in mind that should flooding become an issue for you, we are available 24/7 to assist with emergency repairs. The work we perform is backed by Iron-Clad guarantees that are sure to give you peace-of-mind, not just today, but Always!

How to Keep Your Hose Bibs from Freezing

Are you ready for another winter? Did you get your furnace up and running? Put away your summer clothes and bring out your winter gear? How about put snow tires on your car? Did you drain your hose bibs?

As winter approaches, there is a risk of your hose bibs freezing. Your hose bibs are the pipes that come out of your house where you would attach your garden hoses. Protecting your hose bibs from freezing is one of the last winter tasks that many homeowners perform, but it’s certainly a crucial one. If you neglect to do this important task, ice will form in the spigot, which can lead to cracked pipes. Cracked hose bibs can cause a plumbing disaster in your home’s basement. Taking a few minutes to do this task each fall can save you hundreds in repair bills from the damages caused by neglecting your hose bibs.

How to Drain Hose Bibs

  •   Locate your hose bibs on the outside of your house
  •   Find the shut-off valve inside of your house (if there is one) that leads to each hose bib
  •   Turn the indoor shutoff valve until you feel it close
  •   Go back outside and test the outdoor tap to ensure it is truly shut off
  •   Remove your garden hoses and drain them of water, then place them into storage for the winter
  •   Drain any remaining water from the hose bibs
  •   Ensure any exposed pipes are properly insulated
  •   Place an insulated hose bib cover over the exterior spigots
  •   For optimal plumbing protection and peace of mind, consider replacing standard hose bibs with frost-proof hose bibs

Completing the above steps before the temperature falls below zero will help prevent cracked hose bibs when the temperatures warm up in the spring. All it takes is a small amount of leftover water in the pipe to freeze. Frozen pipes may burst due to the immense pressure. If this happens, your home could experience indoor flooding and costly repairs when you turn on your faucets in the spring and summer.

The last thing you need to worry about is a flood caused by neglected pipes. Whether you need help fixing a drip or you are interested in frost-proofing your hose bibs, Always Plumbing & Heating is here to help. Our trained and licensed plumbers can help you install frost-proof bibs on all of your outdoor faucets.

Call us at 780-489-8118 or book online today.

How to Prevent Your Basement from Flooding

It’s been another rainy summer in Edmonton, and the water table has been rising significantly due to 2 consecutive summers with record rainfall. Heavy rainfall poses a risk to homeowners, in which the water can seep into a basement causing flooding. This can gradually happen over time, causing mold problems, or the issue can be more sudden, causing a massive flood with extensive water damage.

What Causes Basement Flooding?

Basement flooding is the most common type of water damage that happens to a home. Communities that have several drainage ponds are typically lower-lying and may be more prone to flooding. As the heavy rainfall continues, the water table rises, and if your home is not properly maintained and equipped, the water eventually will have nowhere to go but your basement.

Water can enter your basement in a number of ways:

  •   Cracked foundation
  •   Windows and doors that are at ground level
  •   Improper foundation drains or weeping tile
  •   Improper grading with run-off going towards your home
  •   Improper placement of downspouts
  •   Poorly maintained eavestroughs
  •   Power outages causing a sump pump failure

How Can You Protect Your Basement from Water Damage?

Preventing water from entering your home needs a multi-faceted approach to ensure that your basement stays dry. First, you will need to determine if any of the above listed are factors in the water getting in your basement. You will need to assess the grading of your property and the setup of your eavestroughs and downspouts. But the biggest necessity in preventing water from entering your home is ensuring you have an adequate sump pump system. Some homes in flood-prone areas may require more than one sump pump, called a redundant system, for ultimate protection.

Here is what Always Plumbing & Heating recommends to ensure ultimate flood protection from heavy rainfall:

  •   Routine sump pump cleaning
  •   Test your sump pump in the spring and fall
  •   Ensure your sump pump has a backup power source (many floods happen due to power outages)
  •   Consider a redundant system if your home is flood-prone
  •   Ensure all sump pumps have failure alarms installed. You can get some that are Wi-Fi capable and will alert your phone if there is a problem

Even if you do not have water in your basement, don’t wait for it to happen to you to do something. Ensure that you are properly maintaining your sump pump, and taking care of other things that can cause water damage like improper grading and poorly maintained eavestroughs.

If you find water in your basement, it is important to contact a professional plumber to evaluate the full extent of your flooding issues. Flooding not only occurs from heavy rainfall or a high water table, but also can occur from a sewer backup, broken pipes, or leaking hot water tanks.

The plumbing experts at Always Plumbing & Heating will do a full home plumbing inspection to properly diagnose the cause of the flood and provide you with recommendations for repairs. Our team can also help you prevent a problem before it starts by ensuring you have the best system in place to prevent flooding in the first place.

When you have the work done professionally by Always Plumbing & Heating, you will receive guaranteed workmanship and the best warranties that we stand by 24 hours a day. And remember, the best way to avoid water damage is to prevent it!

Call us at 780-489-8118 today to get started.

Conserve Water and Protect Your Home from Water Damage with Flo by Moen

When it comes to water leaks in the home, statistics show:

  •   40% of homeowners will suffer from water damage at some point in their lives.
  •   The average home loses 17 gallons of water daily due to undetected leaks.
  •   60% of Flo by Moen users discover they have a leak they didn’t know existed once they have the device installed.
  •   You are 6X more likely than fire and 5X more likely than theft to experience a catastrophic water damage event in your home.

With these numbers in mind, Moen created a Smart Water shutoff device that they call Flo by Moen. This device attaches to your main water shutoff line in your home and runs daily tests to ensure that your home’s plumbing is running efficiently. The device is linked to your smartphone app, which will send you reports on water usage, as well as emergency alerts in the event that a water leak is detected.

When an unusual amount of water usage is noted by the device, such as in the event of a burst pipe or a running toilet, it will trigger an automatic water shutoff to your home. This will prevent a continual leak which left undetected would either drive up your water bills or potentially cause catastrophic damage to your home.

Flo by Moen is an essential peace-of-mind device for homeowners who are looking for the ultimate in security. If you own a seasonal property that you do not visit all year, you may consider having this device installed there. Likewise, if you frequently travel, especially during the winter months when the majority of burst pipes occur, this device can be a lifesaver on not only your peace of mind but also on your wallet.

The Flo by Moen device also detects temperature changes to your water. In the event that your furnace was to fail, for example, the device would trigger and send you an alert when the water dips to an unsafe temperature. This type of preventative maintenance is key to preventing a catastrophic flood.

It should be mentioned that Flo by Moen will not prevent sewer backups because it works on your home’s main water lines in, not the sewer lines going out. But you can get ultimate flood protection by ensuring that you also get a mainline backflow valve installed in your home. You may even take advantage of some insurance savings when you provide your insurance broker with a copy of your Insurance Verification Letter indicating that your home is equipped with these devices.

If you want to protect your whole home from flooding and find ways to minimize your water use, get started today with Flo by Moen. Once you have the pleasures of using this technology, you will never go without it again!

If you wish to learn more about how Flo by Moen can protect you, your home, and its contents, the expert plumbers at Always Plumbing & Heating would be happy to answer any questions you may have. The certified technicians will run some tests on your home’s water network, and set up the device and your app, ensuring all is done in a seamless manner.

When you have the work done professionally by Always Plumbing & Heating, you will receive guaranteed workmanship and the best warranties that we stand by 24 hours a day. The best way to avoid water damage is to prevent it, and you get exactly that when you have Flo by Moen installed in your home.

Call us at 780-489-8118 today to get started.

Reference: 2020 Moen Inc. https://www.moen.ca/flo/

Getting Your Hose Bibs Ready for Spring

As Spring has begun, and warm weather is just around the corner, you may find yourself spending more time outdoors these days. If you’re doing some spring cleaning, you will likely need to turn on your garden hose at some point.

Harsh Alberta winters with extremely low temperatures can sometimes cause hairline fractures in your hose bibs. If you fail to notice the leak right away, when you turn on your tap you could end up with a flooded basement if you aren’t taking the right precautions before using it.

Steps For Testing If You Have A Fracture In Your Hose Bib

Before turning your water on, follow these steps:

1. Place your thumb over the spigot to cover the whole opening.

2. Turn on the water.

3. If you can hold the water in with your thumb, that means there is a fracture somewhere that the water is going. If this happens, turn the water off immediately.

4. Have a family member go into your basement near where the hose bib is located, and repeat step 3. If there are removable ceiling panels, move them from that area, so you can clearly see the extent of the leak without causing too much damage.

5. Repeat all of these steps to each of your hose bibs.

6. If a leak is located, call a plumber for a repair, including the installation of frost-free hose bibs to prevent this from happening in the future.

How to Prevent Hose Bib Leaks In The Future

Each fall ensure that you remove your garden hoses from each hose bib, and if possible, turn the water off to the hose bib and drain the line. Not all hose bibs are outfitted with shutoff valves.

If you suspect broken hose bibs or want to prevent them entirely, give us a call to diagnose the problem and provide you with the best solution to repair or prevent frozen hose bibs. Failing to repair this issue promptly can lead to disastrous flooding in your basement if someone inadvertently turns on your garden hose. 

Giving your hose bib the attention it deserves is invaluable. Ensuring that your home’s plumbing is properly maintained and up to code with a professional inspection, including installation of frost-free taps, will provide you with total peace-of-mind when the job is handled by a professional. 

Always Plumbing & Heating is here to help you along the way. Our licensed plumbers will take care of this job for you, from start to finish, and we fully guarantee our work and equipment. So give us a call, and go ahead and kick your feet up and relax, in no time you will be safely running your sprinklers and filling up the kiddie-pool for your little ones!

DIY Sump Pump Maintenance

Your homes’ sump pump is one of the most important parts of your home plumbing fixtures in flood prevention. Sump pumps are designed to keep basements from flooding when the water table is higher than your homes’ foundation, particularly in times during large rainfall or after large snowmelt. Edmonton and area commonly receive large volumes of rain, not just in Spring, but in Summer, and sometimes into Fall. In addition to that, with the first snowmelt each the Spring, your sump pump will kick into full gear.  Most, but not all, homes in Edmonton and area will be equipped with at least one sump pump, usually found in your basement utility room. With this knowledge at hand, it is prudent that homeowners pay close attention to the functioning of their sump pumps to ensure that their homes will be kept safe from water damage. There are several steps that homeowners can take to ensure their sump pump is optimally functional.

Do It Yourself Sump Pump Maintenance

Check the Sump Pump for Debris

To check the sump pump for debris, shine a flashlight into the pit that the pump is located, looking for sediment or other contaminants. Remove any debris as it will affect the performance of the pump. You can do this using a slotted spoon, or for smaller sediment, a kitchen sieve with very small holes in it. It is ideal to do this at least every Spring.

Inspect the Sump Pump Check Valve

Also referred to as a one-way valve, this valve ensures that water doesn’t re-enter the sump pump once it shuts off. The valve prevents backflow of water that it has already pumped out, thus making the device a one-way flow system. Check the valve on the water outlet pipe, and ensure the arrow is pointing away from the sump pump.

Sump Pump Routine Cleaning

Clean out both the relief hole and the impeller. To locate the relief hole, find the small opening between the sump pump discharge and the check valve. It can be cleaned using a cotton swab or a toothbrush. The impeller is the filtering mechanism attached to the sump pump. This can get clogged very easily and it should be routinely cleaned, at least monthly, or more often during times of heavy usage.

Test Your Sump Pump

Fill a large bucket with 3 gallons of water and pour it into the sump pump pit. The pump should start automatically, draining the water out of the pit. Try this twice consecutively to ensure the pump is in working order.

Back-up Power Source for Sump Pump

Because the sump pump is powered by electricity, it is important to ensure that your pump has a backup power source. Most power outages happen during major storms, which subsequently is when most basement flooding occurs. If your sump pump doesn’t have a backup power source and your home experiences a power outage during heavy rainfall, your sump pump will not function and the water has nowhere to go but into your home. Install a backup battery on your sump pump to provide you peace of mind protection in this instance.

Redundant System

A redundant system is a backup sump pump. Many homes have both a primary pump as well as a secondary backup pump. Having an emergency backup sump pump will provide the best protection against flooding.

Sump Pump Failure Alarm

Last but not least, a wifi powered sump pump alarm is a must for the homeowner who wants true optimal peace of mind surrounding their homes sump pump system.

Make sure that your home is kept free from flooding and water damage. Check and maintain your sump pump annually to keep it clean and running efficiently. You’ll also want to make sure that it is serviced by a professional at least once a year before the summer or fall. Remember that Always Plumbing & Heating can help you with all of your sump pump repairs. If it is determined that your system is due to be replaced, our skilled plumbers will provide you with options for any and all of the devices listed above, or full integrated smart systems that contain both a primary and backup pump with Wifi remote monitoring.

Prevent Flooding In Your Edmonton Home & Save Money With A Backwater Valve

Protect Your Home From Flooding Due To Heavy Rain & City Sewage Back-up

If getting a mainline backwater valve hasn’t made it onto your spring to-do list yet, now is a great time to add it. During seasons of heavy rainfall, Edmonton homes without sewer backflow valves are at risk of flooding from raw sewage backup. Gurgling up floor drains, toilets, showers, and bathtubs – a raw sewage backup can take many pathways into your home, creating a mess in your living space and inconveniencing your plans.

How Backwater Valves Work

Backwater valves, also known as a backflow preventer, sense backflow from the city sewer system, automatically closing off your pipes to protect your home in the case of a sewage backup. Backwater valves are part of the existing plumbing code for new homes which now come with the backwater valve installed. If you own an older home, you may not have this valve to help provide flood protection.

The good news is that, within the city of Edmonton, EPCOR is offering a backwater valve subsidy up to $800.

If your home was built before 1989 or if you have had previously experienced flooding from stormwater backup, you may qualify for the subsidy.

How To Get The EPCOR Backwater Valve Subsidy

You need to book a pre-approval inspection with EPCOR. Once you are pre-approved, call Always Plumbing & Heating for installation of the backwater valve. After which, submit your invoice to EPCOR for the rebate.

With extra protection against flooding, peace of mind, potential insurance premium reductions, and rebates on the device, it’s a win-win situation you do not want to miss.

Hurry, these rebates are subject to the 2019 EPCOR Flood Prevention program & while quantities last!

Apply for the EPCOR backwater valve subsidy here.

Do I Need a Sump Pump?

Depending on where you live, a sump pump might be one of the most integral parts of equipment in your house – but there’s also a chance you’ll never need one at all. Some of you think, ‘Of course! I’d never go more than a few months without checking my sump pump, it’s too important.’ Others, though, say, ‘What on earth is a sump pump?’ If you fall into the second category, there’s a good chance you don’t need one. Unfortunately, Edmonton lies in a relatively flat area, so flooding is a problem; a sump pump is likely already in your home. On the off-chance you don’t have one, though, the pros at Always Plumbing & Heating have provided some guidelines to give you an idea of what you’d need to experience at home to invest in one.

What is a Sump Pump?

A sump pump is pretty self-explanatory: it’s a pump that is installed in the lowest point of your house – usually the basement – and it pumps out any water, sump, that accumulates when there is flooding. Some are activated via a pressure sensor, and others are triggered by a flotation activator. A sump pump uses centrifugal force to create a low-pressure environment to suck water in and force it out through a pipe that dumps it away from your home. A check valve prevents the water from trickling back through the pipe, ensuring it only funnels away from the pump.

How do I know if I need one?

To determine if you need a sump pump or not, you’ll need to figure out if your house is prone to accumulating water. Obviously, if floods are an issue in the area, you will definitely need one – but if you’re situated in an area without that danger, there’s still a chance you could house excess moisture. If there isn’t any standing water, or if your basement is completely dry, you’re probably safe. However, if moisture is present, run a de-humidifier in the basement and check for moisture again a few weeks later. If it’s still present, go ahead and invest in a sump pump.

Types of Sump Pumps

Sump Pumps are divided into two categories: Pedestal and submersible units.

  • Pedestal sump pumps are installed above ground. They’re easier to install and perform maintenance on than submersible units are – and they’re cheaper! However, they can be affected by the water you’re trying to remove much easier than ones underground can.
  • Submersible sump pumps can be covered with a lid, effectively making them impenetrable. We’d recommend going with this type, if only because there is a reduced risk of them being rendered inoperable since they are secluded.

Whichever one you choose, purchasing a backup battery-powered sump pump is an excellent idea. In the event your primary unit fails, the backup will keep chugging along and provide a critical contingency plan to keep your basement water-free. You’ll also want to install an alarm on your sump pump that will alert you if it fails – so you can take action before the high water gets too much to handle.

Before flood season hits, give the experts at Always Plumbing & Heating a call at 780-489-8118 (Edmonton) or 587-601-1253 (Fort McMurray) to get your sump pumps upgraded or replaced, or have us come out and take care of every step of the installation process. Our highly qualified technicians are available 24/7 throughout the year to take care of you, and it comes with a 100% Customer Satisfaction Guarantee!

How to Handle a Burst Pipe (in Winter) 

Northern Alberta is under an Extreme Cold Warning with wind chill values of -40 to -45 expected to persist into Saturday. This is frozen and burst pipe weather.

We’ve written about how to prevent and thaw frozen pipes, but what happens if it’s too late for that?

Hopefully you can thaw the frozen area or contact a licensed plumber before the pipe bursts and causes expensive property damage. If, however, you do notice a broken or burst pipe, here’s how to handle it.

Burst Pipe Signs

Here are some signs you have a leaking or burst pipe in your home:

  • Dripping sounds
  • Puddles of water
  • Water spots and damage to ceilings and walls
  • Lack of water pressure
  • Main water shut-off shows a leak

How to Handle a Burst Pipe

In the event of a burst pipe, be prepared to act fast.

In the event of a leaking, broken, or burst pipe, turn off the main water supply to prevent any further damage. While you can make a temporary repair while you wait for a plumber’s availability, the pipe will have to be replaced as soon as possible.

  1. Turn Off Main Water Shut-Off

To be safe, if you notice a leaking, broken, or burst pipe, turn off the main water shut-off valve. In the event of an emergency, everyone in the household should know where the main water shut-off is located and how to turn it off.

Consult your property inspection report or professional plumber if you don’t know the location of the shut-off valve. Don’t wait until your pipes burst to start looking!

Turn the valve clockwise to turn it off. Keep in mind that you may have to turn the gate valve several turns to shut it off.

  1. Turn Off Electricity If Necessary

If water has already entered your home and is in danger of contacting any electrical equipment, turn off power to that area of the home. Make sure you turn off the water first, then shut off power at the circuit breaker with dry hands and feet.

  1. Contact a Plumber

As soon as you turn off the water supply to prevent any further damage, contact a professional plumber right away. Not all plumbing companies are 24/7, but if you live in the Edmonton or Fort McMurray area, Always Plumbing & Heating is always available.

The sooner you schedule professional plumbing service, the less expensive your costs will be. Your plumber will also help guide you to the right decision concerning the associated water damage. You may need to contact a water damage specialist for severe cases.

  1. Remove as Much Water as You Can

In order to prevent moisture-related problems, such as mold and mildew, clean up as much of the water as you can. Use wet/dry shop vacuums, rags, mops, buckets, whatever you can. Run a dehumidifier if you have one.

Be on the lookout for early signs of frozen pipes, such as reduced water flow and freezing temperatures. Most plumbing ruptures can be prevented.

If you think a pipe may have burst in your Edmonton home, turn off the water supply and contact Always Plumbing and Heating  at780-489-8118 (Edmonton) or 587-601-1253 (Fort McMurray).

We provide emergency service 24 hours a day, 365 days a year.

Winter Plumbing Tips

Natural Disaster Prep: Flooding in Edmonton

With the recent hurricane activity in the Atlantic causing unprecedented destruction, it’s a good time to review procedures for potential flooding. While Edmonton generally doesn’t experience flooding in the fall, a flood can happen at any time – and without warning. Just last month, a severe thunderstorm caused localized flooding throughout the area. Fortunately, the damage was minimal, with a building fire (caused by lightening) and power outages the only major problems. But random storms like that are increasing, so having plans in place for flooding emergencies is vital.  The staff at Always Plumbing & Heating have put together a list of notes for keeping your household safe in the event of a major flood.

Flood Preparation

  • A flood watch means that residents need to keep aware of the situation. A flood warning means that flooding is imminent and you should take action immediately.
  • If you are at home during a flood warning, keep your smart device, television or radio set to a weather service with the latest news.
  • Research the safest places for you to seek shelter that are close to your residence. In the event of an emergency, you might have to travel on foot to higher ground.
  • Make yourself familiar with area flood zones and make an escape plan (one for leaving the house and one for evacuating the area) accordingly.
  • Secure outdoor furniture by bringing it inside or placing it in a storage area to protect it from flood damage.
  • Place all the important items in your home at the highest point possible.
  • Disconnect all your electrical appliances/electronics.
  • Turn off your gas and electricity at the main source to prevent potential possible fires or explosions.
  • Never walk or drive through flood waters. Just 6 inches of moving water can knock someone down – and just 2 feet of water can move a car. Flood waters can also contain unseen objects that can harm you including electrical wires.

Flood Safety

  • If a flood warning has been issued, head for higher ground immediately. Make sure to keep your smart phone or radio with you.
  • If you are fleeing to a shelter or building that is safe from harm, make sure that the entire household is aware of the location.
  • Again, stay away from waters. If you are driving and come across a flooded road, turn around and drive in the other direction.
  • If your car is caught in flood water while in transit, get out of the car and seek higher ground.
  • If you are evacuating at night, make sure that you have flashlights or reliable light sources.

Post Flood Safety

  • Wait until the area has been declared safe before you return home.
  • If your home was directly affected by the flood, check the perimeter before back inside. Look for any structural or foundation damage, dangling electrical wires, gas leaks or other potentially hazardous problems.
  • Be careful entering your home for the first time. The roof or walls may have collapsed or received damage that could compromise their integrity.
  • Be mindful that standing water might carry an electrical charge or hide objects that might be hazardous.
  • Keep an eye out for animals that might be inside your home after seeking shelter from the storm.
  • When cleaning up your home after a flood, always wear protective clothing including rubber gloves.

Always Plumbing & Heating hopes that our Edmonton neighbors never experience the damaging effects of flooding. Remember that we can help in the event of a remodeling project due to flood damage. We can assist with any number of plumbing or HVAC concerns brought on by water damage. Call us at 780-489-8118 (Edmonton) or 587-601-1253 (Fort McMurray) to schedule an appointment today!

Related Blogs:

Fall Child Safety

Fall DIY Maintenance


For more information on plumbing solutions or to request a service appointment, give us a call at 780-489-8118 or contact us online.

Request Service

Close x

Fill out the service request form below and an Always Plumbing team member will be in touch to confirm your request.

Exit mobile version